

Custom Guitar Body Manufacturing Process: Step-by-Step
Table of Contents
- Understanding the Custom Guitar Body Manufacturing Process
- Selecting and Preparing Guitar Tonewoods
- Digital Design and CNC Guitar Manufacturing
- Cavity Routing and Electronics Integration
- Shaping, Sanding, and Surface Preparation
- Professional Guitar Finishing Techniques
- Guitar Neck Construction Methods and Assembly
- Common Manufacturing Defects and Troubleshooting
Custom Guitar Body Manufacturing Process: Step-by-Step
Last Updated: July 18, 2026
The custom guitar body manufacturing process determines everything from tonal characteristics to playability and aesthetic appeal. At Haynes Guitar & Bass Build, we've refined this process through years of hand-building guitars and basses for musicians who demand precision and tone. Understanding each stage will help you make informed decisions about materials, techniques, and specifications.
Understanding the Custom Guitar Body Manufacturing Process
The complete guitar body manufacturing process involves material selection, design, routing, shaping, finishing, and quality control. A well-executed build typically takes 4-8 weeks, depending on complexity and finish type. Professional luthiers spend 30-40% of their total build time on sanding and surface prep alone, which directly impacts the final finish quality.
Selecting and Preparing Guitar Tonewoods
Tonewood selection shapes your instrument's sonic character. Alder produces balanced, articulate tones ideal for versatile instruments. Ash delivers brighter character with extended treble response. Mahogany emphasizes midrange warmth and sustain, preferred for blues and rock.
Guitar bodies should be milled from wood at 6-8% moisture content. Wood that's too wet will warp and crack as it dries; wood that's too dry becomes brittle and prone to splitting during routing. Book-matched bodies, where two pieces are mirrored to create symmetrical grain patterns, cost 15-25% more but deliver superior visual appeal and often improve tonal balance.
Book-Matching and Grain Selection
Book-matching requires selecting two pieces from consecutive slices of the same log, then orienting them to create mirror-image grain patterns. Straight grain runs parallel to the body length and delivers the most stable, resonant bodies. Figured grain adds visual drama but can create weak spots if the figure runs perpendicular to the body length. Many builders select straight-grain primary wood with figured veneer tops for aesthetic appeal without sacrificing structural integrity.
Digital Design and CNC Guitar Manufacturing
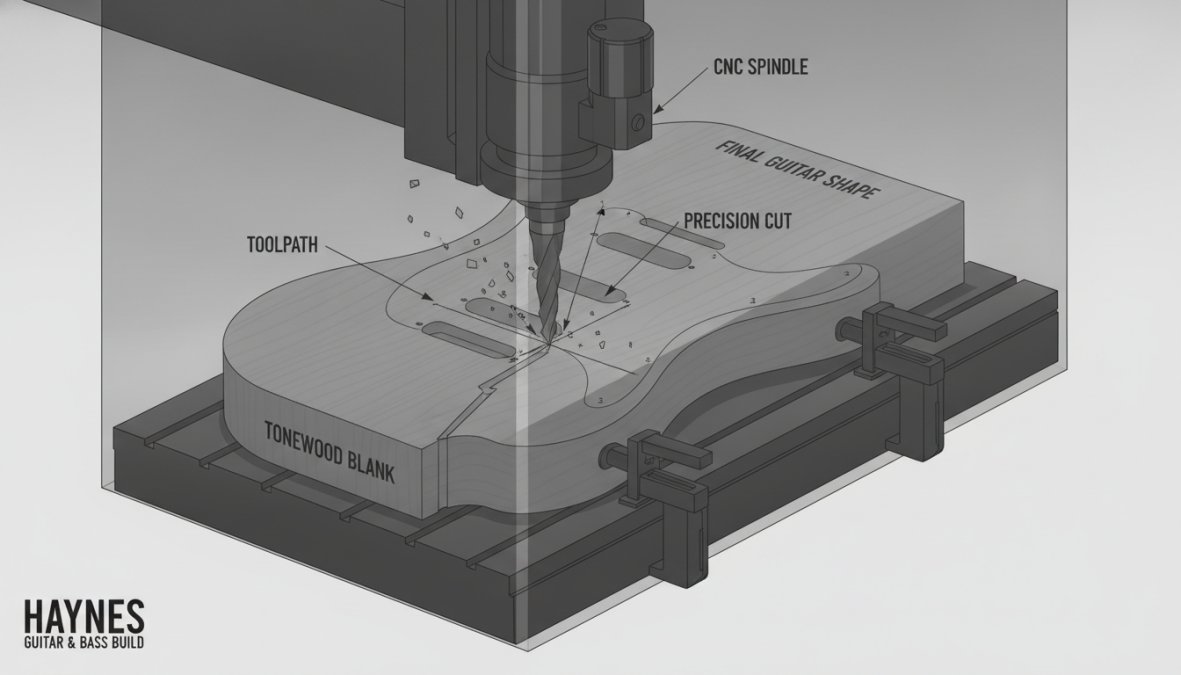
Modern guitar body manufacturing increasingly relies on CAD design and CNC routing. A CNC machine can route a neck pocket with 0.005-inch tolerance, something difficult to achieve consistently by hand. The digital workflow begins with CAD design software like Fusion 360 that generates precise body templates, cavity locations, and routing paths.
However, CNC routing isn't a complete replacement for hand skills. After CNC work, bodies still require hand-shaping of contours, custom edge bevels, and final sanding. The machines excel at precision cavities; humans excel at subtle shaping that makes an instrument feel comfortable and look refined.
CAD Design and Template Creation
CAD design transforms your concept into manufacturing specifications. Professional luthiers typically start with existing body templates like Fender Stratocaster or Telecaster, then modify them in CAD for customization. A template is a full-scale pattern, typically cut from hardboard or MDF, that guides your router during body shaping and cavity routing.
CNC Routing vs. Hand Tools
CNC routers deliver speed and precision that hand tools cannot match. A CNC machine routes a neck pocket in 8-12 minutes with 0.005-inch accuracy; hand-routing takes 45-60 minutes with human variation. The practical approach most professional shops employ is hybrid: CNC for primary routing, hand tools for finishing work.
Cavity Routing and Electronics Integration
Electronics cavities must be routed with precision to ensure proper hardware fit and minimize shielding issues. A pickup cavity routed 0.1 inch too deep creates a gap between pickup and body, degrading tonal coupling. Shielding cavity preparation is critical for noise reduction. After routing, cavities should be sealed with conductive shielding paint or copper foil before electronics installation, reducing electromagnetic interference and hum.
Pickup Routing and Bridge Routing
Standard Stratocaster single-coil pickups require a 1.75-inch × 2.75-inch cavity routed 0.75 inches deep. Humbucker pickups require 2.38-inch × 2.38-inch cavities at 1.5 inches deep. Bridge routing must be flat and level. Even 0.05 inches of variation across the bridge routing creates uneven string pressure and intonation problems. CNC routing provides genuine advantage here: machine-routed bridge cavities are consistently flat, while hand-routed cavities often develop slight peaks and valleys requiring shimming.
Neck Pocket Precision
The neck pocket demands the highest precision. A neck pocket routed 0.05 inches too deep creates a loose fit that buzzes; routed 0.05 inches too shallow prevents the neck from seating fully, creating high action and poor playability. Standard Fender-style bolt-on necks require a pocket 2.4 inches wide, 3.375 inches deep, and routed perpendicular to the body top. The four bolt holes must be drilled at precise locations, typically 1.5 inches apart.
Shaping, Sanding, and Surface Preparation
Body shaping transforms a rectangular blank into an ergonomic, comfortable instrument. This includes contouring the top and back, beveling sharp edges, and creating subtle curves that improve playability. Hand-shaping typically requires 6-10 hours of work with sanders, rasps, and chisels.
Surface preparation requires progressive sanding through increasingly fine grits, starting at 80-120 grit and finishing at 220-320 grit. Each grit removes scratches from the previous grit, building toward a smooth, uniform surface ready for finishing.
Planing and Rough Cutting
The initial rough cutting phase uses a thickness planer to establish consistent body thickness and remove saw marks. Most bodies are planed to 1.75 inches thick, though some builders prefer 1.5 inches for lighter instruments or 2 inches for heavier woods. Planing requires careful attention to grain direction to avoid tearout.
Progressive Sanding and Grain Filling
Progressive sanding begins with 80-120 grit paper to remove planer marks, progresses through 150-180 grit to refine the surface, and finishes with 220-320 grit for a glass-smooth finish. Between sanding grits, the body should be wiped with a tack cloth to remove dust.
Grain filling is essential for woods with open grain structure like ash, mahogany, and walnut. Grain filler is applied after final sanding, then sanded flush.
Professional Guitar Finishing Techniques
Finishing is where a guitar's visual character emerges and its wood is protected from moisture and wear. Most professional builders apply 8-12 coats of finish, sanding between coats to ensure adhesion and smooth buildup. This process takes 4-6 weeks with nitrocellulose or 6-8 weeks with polyurethane.
Nitrocellulose vs. Polyurethane Finishes
Nitrocellulose lacquer has been the standard guitar finish for 70+ years. It's sprayed in thin coats that dry through solvent evaporation. The finish feels thin and responsive; many players report that nitrocellulose finishes allow the body wood to resonate more freely than thicker finishes. However, it chips easily, cracks in response to temperature and humidity changes, and yellows noticeably over 5-10 years.
Polyurethane is a two-part finish that cures through chemical reaction. It's significantly more durable, resisting scratches, dents, and environmental stress far better than nitrocellulose. However, it feels thick and plastic-like and is nearly impossible to repair without professional equipment. A practical approach many builders employ is nitrocellulose over polyurethane: a polyurethane base coat for durability, topped with nitrocellulose for feel and responsiveness.
Buffing, Polishing, and Quality Control
After finish coats have fully cured, the body is buffed and polished to a high gloss. Buffing removes dust particles and minor imperfections embedded in the finish using progressively finer compounds. Quality control involves inspecting the finish under various lighting conditions.
Guitar Neck Construction Methods and Assembly
Neck construction, whether bolt-on or set-neck, determines playability, sustain, and repairability. Most production guitars use bolt-on necks for ease of replacement and repair. Assembly follows a specific sequence: hardware installation, electronics wiring, neck attachment, and final setup.
Bolt-On Neck Pocket Integration
The bolt-on neck pocket must be precisely routed and shimmed to ensure the neck sits at the correct angle. The standard Fender specification places the neck at a slight backward angle, typically 1.5-2 degrees, so the bridge sits at the correct height. The four bolt holes must be drilled at precise locations. Many builders use a drill jig to ensure consistent hole placement.
Scale Length and Hardware Mounting
Scale length, the distance from the nut to the bridge, determines fret spacing and playability. Standard scale lengths are 24.75 inches (Gibson), 25.5 inches (Fender), and 25 inches (many custom builders). Hardware mounting must be precise. Bridge mounting holes must be drilled at exact locations to ensure proper intonation.
Common Manufacturing Defects and Troubleshooting
Even experienced builders encounter manufacturing defects. Understanding common issues and their causes helps prevent them.
Neck pocket misalignment occurs when the neck doesn't sit flush against the body, creating gaps and buzzing. Routing tearout occurs when the router bit exits the wood grain at an angle, splintering the surface. Finish defects like dust particles or orange-peel texture stem from inadequate sanding between coats or improper spray technique. Intonation problems usually result from incorrect bridge routing or hardware installation. Dead spots in the body's resonance typically result from improperly routed cavities or inadequate wood thickness.
| Defect | Cause | Prevention | Fix |
|---|---|---|---|
| Neck pocket misalignment | Routed pocket too deep, shallow, or angled incorrectly | Use CNC routing or precision jig | Shim or re-route pocket |
| Routing tearout | Router bit exits grain at angle | Route against grain; use sharp bits | Fill with wood filler or sand out |
| Finish dust particles | Inadequate cleaning between coats | Tack cloth between each coat | Sand off finish and restart |
| Intonation error | Bridge routed or mounted incorrectly | Verify bridge location before routing | Re-route cavity or reposition bridge |
| Dead spots | Cavity routed too deep or too close to edge | Plan cavity locations carefully | Fill cavity or route new cavity |
The most important troubleshooting principle is prevention. A 30-minute verification step before routing cavities prevents hours of correction work afterward.
Building a professional-quality guitar body requires attention to detail across every manufacturing stage. From tonewood selection through final finishing, each decision influences the final instrument's tone, playability, and durability. Haynes Guitar & Bass Build offers custom bodies and necks built to your exact specifications. Explore our [Custom Stratocaster Body - Built to Your Spec](https://avhkbx-bp.myshopify.com/products/custom-stratocaster-body-built-to-your-spec), Custom Telecaster Body - Built to Your Spec, and Custom Offset Jazzmaster Body - Built to Your Spec to start your build today.
For those interested in detailed manufacturing specifications, our Telecaster Guitar Plans - CNC & Handbuild Download provides professional CAD templates and routing specifications for building your own body from scratch.
Frequently Asked Questions
What materials are used in custom guitar body manufacturing?
The most common tonewoods for custom guitar bodies are alder, ash, mahogany, and maple. Alder offers warm tones and is lightweight; ash provides bright, articulate sound with visible grain; mahogany delivers warm, sustained notes; and maple adds brightness and snap. Your choice directly affects the final tone. Haynes Guitar & Bass Build offers custom bodies in both alder and ash, allowing you to select the tonewood that matches your desired sound profile.
How long does the custom guitar body manufacturing process take?
A typical custom guitar body manufacturing process takes 8-12 weeks from initial design through final finishing, depending on complexity. This includes CAD design (1-2 weeks), material preparation and rough cutting (1 week), routing and shaping (2-3 weeks), sanding and surface preparation (1-2 weeks), and finishing application and curing (2-3 weeks). Rush orders may compress this timeline, but quality finishing requires adequate drying time between coats.
What is the difference between CNC guitar manufacturing and hand-built bodies?
CNC machines offer precision, consistency, and speed for cavity routing and shaping, making them ideal for production runs. Hand-built bodies provide artisanal control, unique character, and the ability to adjust details mid-process. Most professional luthiers use hybrid approaches: CNC for precise cavities and routing, hand tools for shaping and final touches. This combines manufacturing efficiency with craft quality, ensuring both accuracy and tone optimization.
What finishing techniques produce the best tone and durability?
Nitrocellulose finishes are favored by many luthiers for tonal resonance, they're thinner and allow the wood to vibrate freely. Polyurethane finishes offer superior durability and water resistance, ideal for gigging musicians. Professional finishing involves grain filling, multiple thin coats, sanding between applications, and final buffing and polishing. The choice depends on your priority: maximum tone (nitrocellulose) or maximum protection (polyurethane). Haynes Guitar & Bass Build uses professional-grade techniques tailored to your specifications.
This article was written using GrandRanker