

Custom Guitar Neck Radius Explained: A Builder's Guide
Table of Contents
- What Is Fingerboard Radius and Why It Matters
- How Fingerboard Radius Is Measured and Calculated
- Small vs. Large Radius: Characteristics and Trade-Offs
- Compound Radius Fretboard Advantages Explained
- Guitar Neck Profile vs. Radius: Key Differences
- Fretboard Radius Chart: Common Standards and Specifications
- How to Choose Guitar Neck Shape and Radius for Your Build
- Custom Radius Builds at Haynes Guitar & Bass Build
Last Updated: July 24, 2026
What Is Fingerboard Radius and Why It Matters
The fingerboard radius describes the arc across the width of your fretboard, from bass to treble. Measured in inches, a smaller number means a tighter arc; a larger number means a flatter fretboard. This detail profoundly influences string action, bending comfort, chording ease, and overall playability.
At Haynes Guitar & Bass Build, we've worked with hundreds of builders and players to dial in the perfect radius for their specific playing style. Radius preference is highly individual and depends on your playing style, hand size, and the genres you favour. When building a custom instrument, you can choose your radius deliberately rather than accepting whatever comes stock on a factory guitar.
The Arc: Understanding the Basic Concept
The fingerboard radius is literally an arc, a curved surface that runs perpendicular to the length of the neck. On a tighter radius (say, 7.25 inches), the strings are closer together at the nut and bridge, making it easier to fret multiple strings at once. On a flatter radius (say, 16 inches or compound), the strings spread out more, giving you more room to bend individual strings without hitting adjacent ones.
The radius affects three critical playing scenarios: chording comfort, string bending without choking out, and fret buzz management. A tighter radius lets you cover all six strings with less hand pressure on barre chords. A flatter radius prevents bent strings from hitting adjacent strings. When your action is low, a flatter radius prevents unwanted fret buzz.
How Fingerboard Radius Is Measured and Calculated
The fingerboard radius is measured using a specialized tool called a radius gauge. The gauge is a curved metal or plastic template with a known radius that you place against the fretboard. If the fretboard matches the gauge's arc perfectly, you've got your radius confirmed.
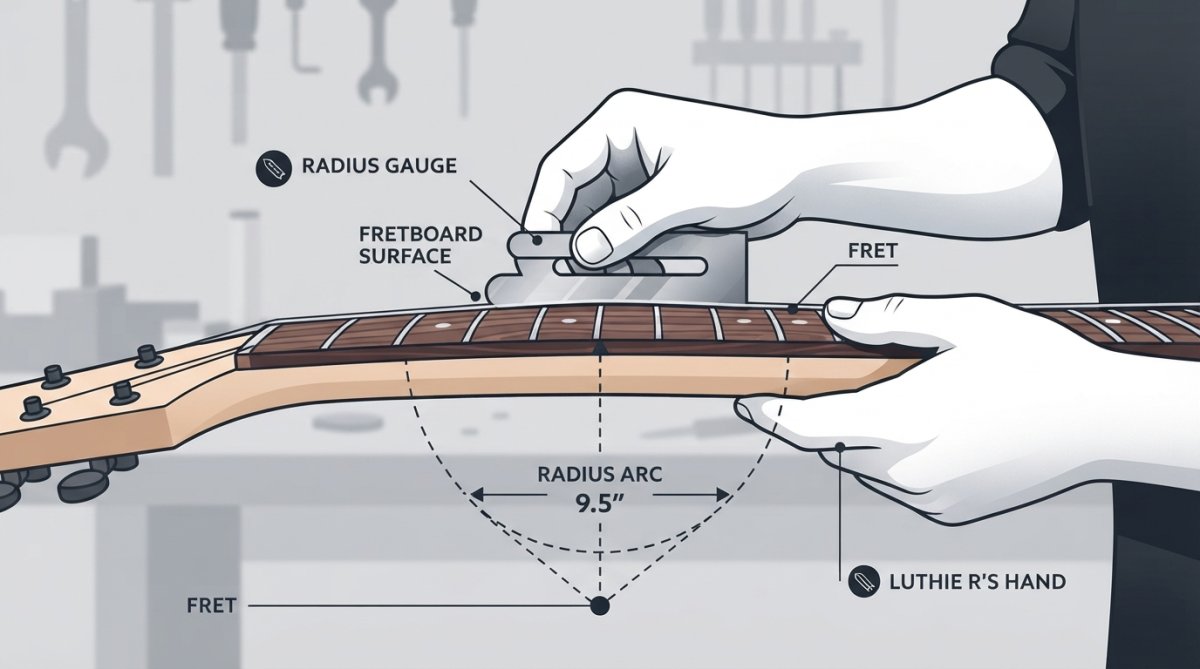
The calculation is straightforward: radius is the diameter of the circle that would produce that arc. A 7.25-inch radius means the arc is part of a circle with a 7.25-inch diameter. The measurement runs across the width of the fretboard, not the length.
Understanding Radius Gauges and DIY Measurement
Professional luthiers use precision radius gauges made from hardened steel or aluminum in common standard sizes: 7.25, 9.5, 12, 15, and 16 inches. You place the gauge against the frets and look for gaps. If the frets are level and match the radius perfectly, the gauge sits flush with no light showing underneath.
For DIY builders, a full set of radius gauges can be expensive. Practical alternatives include creating simple DIY gauges using flexible materials, printing radius templates at full scale, or using a combination of straightedges and feeler gauges. The key is consistency: measure at multiple points across the fretboard (at the nut, middle, and body end) to ensure the radius is even.
According to Fender's neck specifications documentation, precision in radius measurement is critical because even a 0.5-inch variance can noticeably affect playability.
Small vs. Large Radius: Characteristics and Trade-Offs
A small radius (7.25 to 9.5 inches) creates a pronounced arc across the fretboard. This tight arc suits rhythm playing and vintage-style chording. Your hand naturally falls into a comfortable position for barre chords, and the strings are naturally bunched together, making it hard to miss a string.
The trade-off is bending. When you bend a string upward on a small radius, it's easy to hit the adjacent string and choke it out. This is especially problematic on the higher strings. Players who bend frequently, blues, rock, and lead guitarists, often find a small radius restrictive.
A large radius (12 to 16 inches, or compound) creates a much flatter arc. This flat profile gives you maximum bending room; you can bend the third string without worrying about hitting the second string. The strings are spread out, giving your fingers more space to articulate individual notes.
The downside is chording comfort. On a very flat radius, barre chords require more hand pressure to fret all six strings cleanly. A flat radius is also less forgiving of high action; if your strings sit too far from the fretboard, you'll experience dead spots.
The middle ground, 9.5 to 12 inches, offers a compromise. You get decent chording comfort without sacrificing too much bending room. Many modern guitars use 9.5 to 10 inches as a standard because it suits many playing styles.
Vintage Radius Standards vs. Modern Specifications
Vintage Fender Stratocasters and Telecasters from the 1950s and 1960s used a 7.25-inch radius. This suited the playing styles of the era: surf, rock, and country, which didn't demand aggressive bending.
Gibson guitars traditionally used a 12-inch radius, reflecting their target audience of jazz and blues players who prioritized smooth chording over lead work. This difference became part of each brand's sonic and tactile identity.
Modern builders have moved toward flatter radii or compound radii as manufacturing precision improved and playing styles evolved. Contemporary Fender models often use 9.5 inches as a compromise. High-end custom builders frequently offer 10 to 12 inches, or compound radii, to suit modern playing demands. This shift reflects a broader trend: as players became more technically demanding, the limitations of a tight radius became more apparent.
Compound Radius Fretboard Advantages Explained
A compound radius fretboard doesn't have a single arc; instead, it gradually changes from a tighter radius at the nut to a flatter radius at the body end. For example, a fretboard might start at 9.5 inches at the nut and flatten to 12 inches by the 12th fret, then continue flattening to 16 inches at the body end.
This design elegantly solves the radius compromise. At the nut, the tighter arc provides comfortable chording without requiring excessive hand pressure. As you move up the neck toward the body, the radius flattens, giving you more bending room for lead work. Your hand position changes naturally as you move up the neck, so the changing radius feels intuitive.
According to [Warmoth's neck profile(https://avhkbx-bp.myshopify.com/blogs/news/custom-guitar-neck-profile-guide) guide | warmoth.com], compound radius fretboards have become the standard for high-end custom builds because they deliver the best of both worlds. The manufacturing challenge is more complex than a single radius, which is why compound radius fretboards command a premium price. However, for builders who can execute it properly, the playability improvement justifies the cost.
Guitar Neck Profile vs. Radius: Key Differences
Neck profile and radius are often confused because they both describe the shape of the neck, but they're measuring different things. The radius is the arc across the width of the fretboard (bass to treble). The neck profile is the shape of the back of the neck, the part your hand actually grips.
Neck profiles are typically described as C-shape, U-shape, or V-shape. A C-shape is rounded and comfortable for most hands. A U-shape is deeper and fuller, offering more support for the palm. A V-shape is angular, with a sharp ridge down the center. These profiles don't affect the radius; you can have a 7.25-inch radius paired with a C-shape or a U-shape.
The radius affects playability at the fretboard; the profile affects comfort in your hand. Both matter, and both should be considered independently when specifying a custom neck.
Fretboard Radius Chart: Common Standards and Specifications
| Radius (inches) | Characteristic Arc | Best For | Playing Style |
|---|---|---|---|
| 7.25 | Tight, pronounced curve | Vintage chording, barre work | Rhythm, blues, country |
| 9.5 | Moderate curve | Balanced chording and bending | Rock, pop, general purpose |
| 12 | Flatter, subtle curve | Lead bending, articulation | Jazz, blues, lead-heavy |
| 15-16 | Nearly flat | Maximum bending room | Modern shred, technical lead |
| Compound (9.5-16) | Gradual transition | All styles, all positions | Professional/custom builds |
This chart shows the most common specifications found in production and custom guitars. Vintage Fender standardized at 7.25 inches, while vintage Gibson used 12 inches. Modern Fender models typically use 9.5 inches. Custom builders often offer 10 to 12 inches or compound radii.
How to Choose Guitar Neck Shape and Radius for Your Build
Choosing your radius starts with honest assessment of your playing style. Do you spend more time playing chords or lead lines? How aggressively do you bend strings? What's your hand size relative to the fretboard width?
If you're primarily a rhythm player or you play blues with lots of barre chords, a tighter radius (7.25 to 9.5 inches) will feel natural and comfortable. If you're a lead player who bends frequently, a flatter radius (12 to 16 inches) gives you the room you need without choking out adjacent strings. If you play multiple styles, a compound radius (or a middle-ground 9.5 to 10 inches) is your best bet.
Radius, Nut Width, and Fret Wire Compatibility
The radius doesn't exist in isolation; it interacts with two other critical specifications: nut width and fret wire size. These three elements must work together harmoniously.
Nut width typically ranges from 1.5 inches (narrow, for lead guitars) to 1.875 inches (wide, for classical or comfort-focused builds). A narrower nut concentrates the strings closer together, which pairs well with a tighter radius. A wider nut spreads the strings out, which suits a flatter radius better.
Fret wire size also matters. Vintage fret wire is smaller and sits lower in the fret slots. Modern fret wire is taller and crowns higher. A tighter radius paired with tall fret wire creates a very pronounced arc that might feel uncomfortable. A flatter radius with tall fret wire gives you a more playable combination.
When specifying a custom neck, provide all three measurements together: "I want a 9.5-inch radius with a 1.75-inch nut width and modern tall fret wire." This ensures the luthier can optimize the entire fretboard geometry for your specifications.
String Bending, Chording Comfort, and Playing Style
String bending is where radius becomes visceral. On a tight radius, bending the third string upward naturally brings it into contact with the second string. Professional players develop techniques to minimize this, but for most players, especially those learning lead technique, a flatter radius removes this friction entirely.
Chording comfort is the inverse. On a flat radius, playing a clean barre chord across all six strings requires more hand pressure and finger strength. On a tight radius, the natural arc of the fretboard helps you; you can fret all six strings with less effort.
Match your radius to your primary playing mode. If you're 80% rhythm and 20% lead, a 7.25 or 9.5-inch radius serves you well. If you're 20% rhythm and 80% lead, go flatter. If you're split 50-50, a compound radius or 10-inch standard radius balances both demands.
Custom Radius Builds at Haynes Guitar & Bass Build
When you commission a custom instrument from Haynes Guitar & Bass Build, the radius specification is one of the first conversations we have with you. Our approach starts with understanding your playing style, hand size, and the genres you focus on. We ask detailed questions about your current guitars and what you like or dislike about their feel.
From there, we recommend a radius that matches your profile. For a player coming from vintage Fenders who wants to explore lead playing, we might suggest 9.5 inches as a bridge between comfort and capability. For a shredder who needs maximum bending room, we'd recommend 12 inches or a compound radius. For a fingerstyle player who values both comfort and articulation, a compound radius is often the ideal choice.
Our hand-built necks are crafted with precision radius gauges at multiple points to ensure consistency. We pair your chosen radius with a neck profile and nut width that optimize playability. We also work with you to select appropriate fret wire, modern tall frets for lead-focused builds, or vintage-style frets for traditional aesthetics.
The [Haynes Demeanour Custom Guitar](https://avhkbx-bp.myshopify.com/products/haynes-demeanour-custom-guitar) can be specified with your preferred radius, nut width, and profile. At £3,200, it represents a significant investment, but the precision of the build, including radius accuracy, ensures that your instrument plays exactly the way you envision it.
We also offer custom necks separately for builders who want to retrofit an existing body or assemble a partscaster. Whether you're building a full instrument or upgrading a neck, specifying your radius upfront prevents costly mistakes down the line.
Choosing the right radius for your custom build is a foundational decision that shapes how your guitar feels and responds every time you pick it up. Haynes Guitar & Bass Build specializes in hand-built custom necks where every specification, including your chosen radius, is tailored to your exact playing style. Whether you're building a full custom instrument or upgrading with a precision neck, working with experienced builders who understand the relationship between radius, nut width, and fret wire ensures you end up with an instrument that plays the way you intend.
Frequently Asked Questions
What is fingerboard radius and how does it affect playability?
Fingerboard radius is the curvature of your fretboard, measured in inches. A smaller radius (e.g., 7.25 inches) creates a tighter arc, making open chords easier but potentially causing fret buzz during bending. Larger radii (12 inches or more) flatten the curve, improving string bending and reducing choking out, though open chords require more finger strength. The radius directly impacts string action, chording comfort, and overall playability.
What are the advantages of a compound radius fretboard?
A compound radius fretboard advantages include combining the best of both worlds: a tighter radius at the headstock for easier open chording, transitioning to a flatter radius towards the body for improved string bending and reduced choking out. This graduated approach accommodates multiple playing styles without compromise, making compound radius especially popular in modern builds where versatility matters.
How do I measure my guitar's fretboard radius using a DIY gauge?
You can create a simple DIY radius gauge using a flexible straightedge and feeler gauges. Place the straightedge across the frets, then slide feeler gauges under it at the centre of the fretboard. The gauge thickness where it just touches the frets indicates your radius. Alternatively, purchase an affordable radius gauge (typically under £20) from luthier suppliers. Measure at multiple points along the neck for accuracy, especially if checking for fret leveling issues.
What's the difference between vintage and modern guitar neck radius standards?
Vintage specifications like Fender's classic 7.25-inch radius were designed for lighter string gauges and lower action. Modern radius standards (9.5 to 12 inches or flatter) accommodate heavier strings, higher action, and contemporary playing techniques. Gibson historically used 12-inch radius. Modern builders often choose compound or flatter radii to suit current playing styles, though vintage-spec necks remain popular for period-correct builds and specific tonal characteristics.
This article was written using GrandRanker