

How to Upgrade Guitar Electronics: A Step-by-Step Guide
Table of Contents
- Why Upgrade Guitar Electronics and What You'll Need
- Understanding Pickups and Their Impact on Tone
- Best Guitar Pots for Tone Control and Volume
- Capacitors and Tone Shaping: Building Your Sound
- Reading and Following a Guitar Wiring Diagram
- Soldering Guitar Electronics: Technique and Best Practices
- The Treble Bleed Mod and Advanced Upgrades
- Step-by-Step: How to Upgrade Guitar Electronics Safely
Last Updated: July 25, 2026
Learning how to upgrade guitar electronics can transform your instrument's sound and playability in ways that buying a new guitar often cannot. At Haynes Guitar & Bass Build, we've guided countless musicians through electronics upgrades, from simple pickup swaps to complete rewiring overhauls. Whether you're chasing vintage warmth, modern clarity, or something entirely unique, understanding the components involved and the techniques required makes the difference between success and frustration.
This guide walks you through every stage: identifying which components matter most, selecting the right parts for your sound goals, and executing the work with confidence.
Why Upgrade Guitar Electronics and What You'll Need
Most factory electronics are engineered for cost efficiency, not sonic performance. Cheap potentiometers introduce noise and scratching. Stock capacitors muddy high-end clarity. Poorly shielded cavities invite hum and interference. When you upgrade these components, you're removing sonic compromises that have been holding your instrument back.
Before you begin, gather these essential tools:
- Soldering iron (25-40 watts)
- Solder (60/40 or 63/37 tin/lead ratio)
- Desoldering pump or solder wick
- Flux (rosin core or liquid)
- Multimeter
- Wire strippers and cutters
- Small screwdrivers (Phillips and flathead)
- Needle-nose pliers
- Heat-resistant mat
Understanding Pickups and Their Impact on Tone
Your pickups convert string vibrations into electrical signals and determine the character of that signal before anything else happens.
Single-coil pickups deliver brightness, clarity, and articulation, ideal for blues, country, and classic rock. The tradeoff is noise; single-coils are prone to hum near fluorescent lights or computer monitors.
Humbuckers use two coils wound in opposite directions to cancel hum while delivering thicker, warmer tones with more output and sustain. They suit hard rock, metal, and jazz.
The Haynes Golden Root 1957 Stratocaster pickup set captures early Fender tone: articulate treble, woody midrange, and natural breakup when pushed. Hand-wound in the UK at £89.00, these pickups offer tonal character that factory options rarely match.
When selecting pickups, consider your amplifier's headroom and playing style. A high-output humbucker paired with a clean tube amp will bloom beautifully; the same pickup through a solid-state practice amp may sound compressed.
Best Guitar Pots for Tone Control and Volume
Potentiometers do far more than turn volume up and down. Their quality, taper, and resistance value shape how responsive your tone controls feel and how dramatically they affect your signal.
A potentiometer's resistance is typically 250K for single-coil guitars and 500K for humbuckers. This isn't arbitrary: 250K pots preserve high-end brightness with single-coils, while 500K pots provide more treble presence with humbuckers.
The taper describes how resistance changes as you turn the knob. Audio taper (logarithmic) curves the response so the most useful changes happen in the first half of rotation, matching how human hearing perceives volume. Linear taper increases resistance in a straight line, offering more fine-tuned control but less intuitive feel.
For most players, audio taper pots deliver a more musical feel. Stock pots often use carbon composition elements that wear out and develop scratches and noise. Upgraded pots with sealed elements last longer and maintain clean signal transfer across the entire rotation.
Capacitors and Tone Shaping: Building Your Sound
If pickups are your guitar's voice, capacitors are the tone controls that shape that voice. A capacitor stores electrical charge and acts as a frequency filter, rolling off high frequencies when used with tone control potentiometers.
Capacitance is measured in microfarads (µF). Typical guitar tone controls use 0.022µF or 0.047µF capacitors. The larger the value, the more aggressively the tone control cuts treble.
The material influences tone coloration. Paper-in-oil capacitors add warmth and slight compression. Film capacitors offer transparency and accuracy. Ceramic capacitors are cheap but introduce subtle harshness. For upgrades, film capacitors represent the best balance of affordability and tonal neutrality.
A common upgrade is replacing the stock capacitor with a higher-quality film capacitor of the same value. This removes coloration and noise without changing how the control responds. To alter the feel of your tone control itself, experiment with different capacitance values.
Reading and Following a Guitar Wiring Diagram
A wiring diagram is your roadmap for understanding how all components connect. Without one, you're guessing, and guessing in electronics often leads to grounding issues, phase problems, or complete signal loss.
Standard diagrams show pickups, potentiometers, capacitors, switches, and the output jack, with lines representing solder joints and connections. The ground symbol (horizontal lines) shows where components connect to the shielded cavity and bridge ground.
When upgrading, compare your current wiring to your target wiring. Identify which connections change and which remain the same. Take photos of your current setup before desoldering anything.
Grounding and Shielding Techniques for Noise Reduction
Grounding is the single most overlooked aspect of guitar electronics upgrades, and it's where most noise problems originate. A proper ground connects all components to a common reference point, typically the bridge and the shield inside the guitar cavity.
Create a dedicated ground bus, a heavier gauge wire that runs from the bridge to each component's ground lug. This provides a low-resistance path that minimizes hum and noise.
Shielding involves wrapping signal wires in conductive material that connects to ground. Paint the inside of the guitar cavity with conductive shielding paint, apply copper foil to the underside of the pickguard, and wrap signal wires in shielded cable from the pickups to the potentiometers. Every shield connects to the ground bus.
The difference between proper grounding and sloppy grounding is often the difference between a quiet, articulate signal and a noisy, hum-prone mess.
Soldering Guitar Electronics: Technique and Best Practices
A good solder joint is permanent, low-resistance, and mechanically strong. A bad joint (cold solder joint) is brittle, high-resistance, and fails months later.
Heat the joint with the iron tip for 2-3 seconds, allowing heat to flow into both the wire and the component lug. Apply solder to the joint, not directly to the iron, and let the heat melt it. The solder should flow smoothly and coat the joint evenly. The joint should cool to a shiny, cone-shaped appearance.
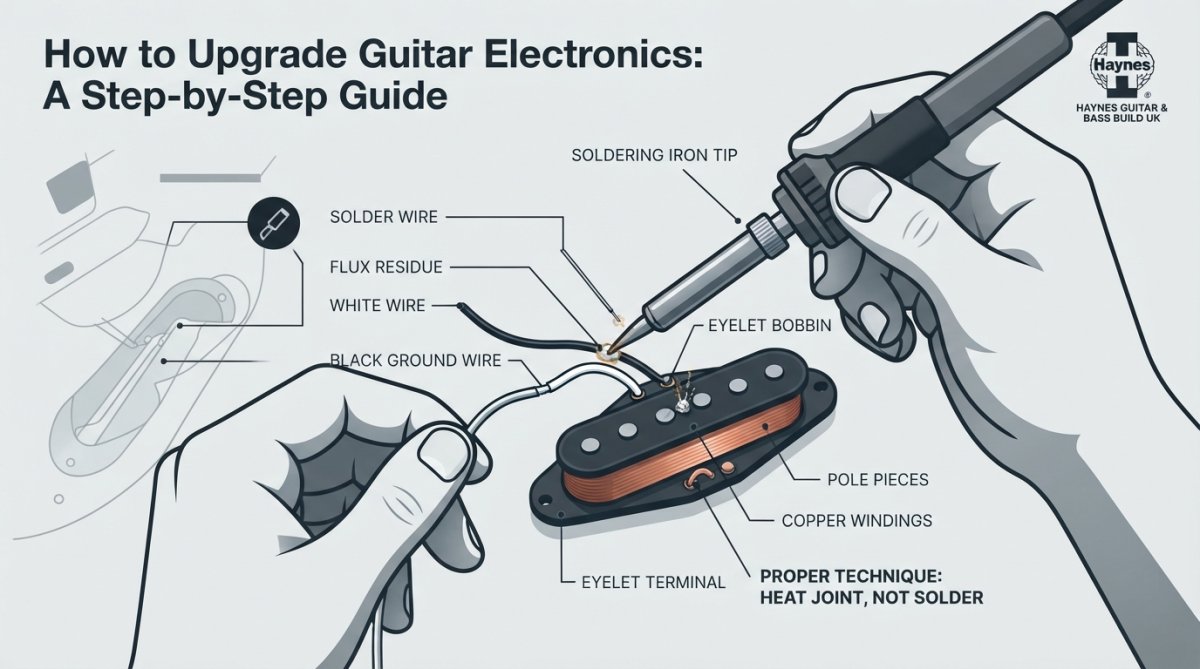
A cold solder joint appears dull and grainy instead of shiny and smooth. It forms when the joint isn't hot enough to fully melt the solder, creating a weak connection that fails under vibration.
Flux cleans oxidation from component lugs and solder, allowing heat to transfer more efficiently. Use rosin-core solder or apply liquid flux before soldering. After soldering, clean away excess flux with a damp sponge to prevent corrosion.
Avoiding Cold Solder Joints and Flux Residue
Ensure the joint reaches full solder flow; you'll see the solder melt and flow smoothly, not sit as a ball on top of the connection. If you suspect a joint is cold, reflow it: heat it again until the solder melts and flows, then remove heat.
Flux residue can trap moisture and cause corrosion over time. Clean it away with a flux cleaner (isopropyl alcohol and a small brush) after each joint cools.
The Treble Bleed Mod and Advanced Upgrades
As you roll back the volume pot on most guitars, high frequencies disappear along with the volume. A treble bleed mod is a small capacitor and resistor combination that bypasses some high frequencies around the volume pot, preserving brightness even at lower volumes.
The mod uses a 0.001µF capacitor in series with a 150K resistor, connected between the volume pot's input and output lugs. This allows treble frequencies to bypass the pot's resistance, maintaining presence at lower settings. The effect is most noticeable on single-coil guitars.
Push-Pull Pots, Coil Splitting and Active vs Passive Electronics
A push-pull pot adds a switch underneath a standard potentiometer, allowing you to toggle between two different circuits. Common uses include coil splitting (converting a humbucker to single-coil mode) or engaging a boost circuit.
Coil splitting disconnects one of the humbucker's coils, making it behave like a single-coil pickup. This gives you tonal flexibility without changing pickups. The tradeoff is increased hum when split.
Active electronics use a battery-powered preamp to boost signal and provide EQ shaping. Passive electronics rely on component values and wiring alone, with no powered circuitry. For most upgrades, passive electronics remain the better choice. They're simpler, more reliable, and require no power source.
Step-by-Step: How to Upgrade Guitar Electronics Safely
Step 1: Document Your Current Setup
Take clear photos of your current wiring from multiple angles. Draw a simple diagram showing how wires connect.
Step 2: Remove the Electronics
Unsolder the output jack first, then the switch, then the potentiometers. Use a desoldering pump or solder wick to remove old solder from the lugs.
Step 3: Prepare the Cavity
Clean the cavity with a damp cloth and inspect for damage. If upgrading to shielded components, apply shielding paint or foil and allow to dry completely.
Step 4: Install New Components
Start with the output jack, then the switch, then potentiometers. Solder carefully, using proper technique.
Step 5: Create Ground Connections
Install a ground bus, a heavier gauge wire connecting all ground points. Every component's ground lug connects to this bus.
Step 6: Install Pickup Wires
Connect pickup hot wires to the appropriate switch lugs. Connect pickup ground wires to the ground bus. Use shielded cable for pickup leads if upgrading for noise reduction.
Step 7: Test Before Closing
Before reassembling the guitar, test the electronics with a multimeter and by connecting to an amplifier. Verify all controls respond correctly.
Testing with a Multimeter and Continuity Checks
Set your multimeter to continuity mode and test that all ground connections are truly connected; the meter should beep when probes touch both ends of a ground wire.
Test for shorts by checking that hot signal wires don't accidentally touch ground. Set the meter to resistance mode; a short reads near zero ohms instead of infinity.
Test potentiometer function by rotating the knob while measuring resistance. The value should change smoothly from minimum to maximum.
| Testing Step | What to Check | Expected Result | If Failed |
|---|---|---|---|
| Continuity test | Ground connections | Multimeter beeps | Resolder the joint |
| Resistance test | Potentiometer rotation | Smooth 0-max change | Replace the pot |
| Short circuit test | Hot wires near ground | Infinite resistance (∞) | Reposition or insulate wire |
| Output jack test | Signal path to amp | Clean audio signal | Check all connections |
Upgrading guitar electronics doesn't require advanced knowledge or expensive tools; it requires patience, attention to detail, and understanding what each component does. The musicians who achieve the best results are those who take time to understand their current setup, choose components that match their goals, and execute the work methodically.
If you're building a custom instrument or upgrading an existing one, Haynes Guitar & Bass Build can supply hand-wound pickups and precision components engineered for superior tone. The Haynes Golden Root 1957 Stratocaster pickup set (£89.00) and Haynes Golden Root P90 classic (£115.00) are specifically designed for players who refuse to compromise on sound. Combined with proper soldering technique, quality potentiometers, and careful grounding, these components form the foundation of an electronics upgrade that rivals or exceeds factory specifications. Start your upgrade today and rediscover your instrument's true voice.
Frequently Asked Questions
What's the best way to upgrade guitar electronics without professional help?
Start with a quality soldering iron, multimeter, and a clear guitar wiring diagram. Begin with simpler upgrades like pickups or potentiometers before tackling complex wiring. Take time to understand grounding and shielding techniques to avoid noise issues. Test continuity with your multimeter at each step. Many guitarists successfully upgrade their own electronics by following detailed guides and working methodically. If you're uncertain, consider pre-wired harnesses to simplify the process.
How much does it typically cost to upgrade guitar electronics in the UK?
Costs vary widely depending on components. Quality hand-wound pickup sets like the Haynes Golden Root 1957 Stratocaster pickup set start from £89.00. Individual potentiometers and capacitors cost £5-£15 each. A soldering iron and basic tools range from £20-£50. A full electronics upgrade (pickups, pots, capacitors, wiring) typically costs £150-£300 depending on component quality. Pre-wired harnesses can reduce labour time and cost if you're uncomfortable soldering.
Can I use pre-wired harnesses instead of soldering individual components?
Yes, pre-wired harnesses are an excellent option if you're uncomfortable soldering. They come with potentiometers, capacitors, and output jacks already wired and tested. This eliminates the risk of cold solder joints and ground loop issues. However, harnesses offer less customisation than building your own wiring. They're ideal for beginners or those upgrading pickups only. Ensure your harness matches your guitar's configuration (single-coil, humbucker, or hybrid) and impedance requirements before purchasing.
What's the difference between audio taper and linear taper potentiometers for guitar tone control?
Audio taper potentiometers are designed for volume and tone control, offering a logarithmic response that matches human hearing perception. They provide finer control in the lower range and smoother transitions. Linear taper pots increase resistance proportionally and are better suited for passive tone circuits where you want consistent sweep across the full range. For most guitar upgrades, audio taper pots are the standard choice for volume and tone controls because they feel more natural when adjusting your sound during play.
This article was written using GrandRanker