

Precision Guitar Neck Pocket Fit: The Complete Guide
Table of Contents
- Why Precision Guitar Neck Pocket Fit Matters
- Standard Guitar Neck Pocket Dimensions and Specifications
- Diagnosing Neck Pocket Problems: Visual and Physical Assessment
- Routing Guitar Neck Pocket for Precision Fitment
- How to Align a Bolt-On Neck in the Pocket
- Fixing Loose Neck Pocket: Repair Techniques
- Guitar Neck Angle and Its Impact on Pocket Fit
- Achieving Precision Neck Pocket Fit in Custom Builds
Last Updated: July 21, 2026
Why Precision Guitar Neck Pocket Fit Matters
A loose neck pocket reduces sustain by 15-20% and introduces fret buzz and intonation issues that setup work cannot fully correct. When a bolt-on neck sits properly, vibrations transfer directly from strings through neck into body. Wiggle room scatters those vibrations, damping signal and robbing sustain, clarity, and dynamic response.
Most builders treat neck pocket fit as an afterthought, assuming that as long as the neck doesn't fall out, it's acceptable. That assumption costs tone and reliability. Below, we'll show you how to diagnose pocket problems, understand critical specifications, and execute repairs or builds that achieve professional-grade precision.
How Neck Pocket Tightness Affects Tone and Sustain
A loose bolt-on neck connection becomes a mechanical weak point. Instead of acting as a unified resonating chamber, the body and neck function as semi-independent objects coupled by friction and bolts, resulting in energy loss at every vibration cycle.
A tight fit creates direct vibration transfer. Strings excite the neck, which immediately couples that energy into the body wood. The body resonates as a complete system, amplifying vibrations before they reach the air. Sustain extends naturally because the entire instrument works as one acoustic unit.
A loose pocket introduces micro-movements. As the string vibrates, the neck rocks slightly in its pocket, absorbing energy that should sustain the note. Players describe this as a "dead" or "muted" tone.
Vibration Transfer and Structural Integrity
A tight neck pocket is essential for long-term stability. Wood moves constantly in response to humidity and temperature changes. A loose pocket allows the neck to shift seasonally, creating micro-fractures at the heel and around mounting bolts. Over time, this causes heel cracks, a costly repair that weakens the instrument permanently.
When the pocket is precisely fitted, the neck and body move as one unit. Seasonal wood movement happens uniformly, and stress distributes evenly across pocket walls and bolts rather than concentrating at pressure points. This even distribution prevents the localized cracking that loose pockets invite.
Standard Guitar Neck Pocket Dimensions and Specifications
Neck pocket dimensions vary by body style and bolt-on neck design, but certain standards have emerged as industry norms. Understanding these specifications is essential for routing a pocket, evaluating a build, or troubleshooting fit issues.
Fender-Style Bolt-On Neck Pocket Standards
A standard Fender Stratocaster neck pocket measures approximately 2.375 inches wide (the width of the neck heel) by 3.5 inches deep (measured from body surface to back wall). The pocket depth is critical; too shallow and the neck bottoms out; too deep and you lose clamping pressure on the bolts.
The pocket walls should be parallel and square to the body surface. Any taper or angle introduces alignment problems immediately. The back wall should be perpendicular to the body top, creating a solid stop point where the neck heel seats. Without that square back wall, the neck can shift forward and backward even when bolted down.
Most Fender-style necks use four bolts in a rectangular pattern. The bolt holes should be drilled perpendicular to the pocket floor, and the floor itself should be flat and level. Even a 1/16-inch deviation in flatness causes uneven bolt tension.
| Specification | Standard Fender | Tolerance Range | Impact if Off |
|---|---|---|---|
| Pocket width | 2.375" | ±0.010" | Binding, rocking side-to-side |
| Pocket depth | 3.5" | ±0.050" | Neck bottoming, insufficient clamp |
| Wall squareness | 90° | ±0.5° | Misalignment, heel cracks |
| Floor flatness | 0.000" | ±0.030" | Uneven bolt tension |
| Bolt hole spacing | 2.75" x 1.75" | ±0.020" | Stripped holes, binding |
CNC Tolerance vs. Vintage Hand-Cut Pockets
Modern CNC-routed pockets typically hold tolerances of ±0.010 to ±0.020 inches and require minimal fitting. Vintage hand-cut pockets often show tolerances of ±0.050 to ±0.100 inches or wider, requiring more careful fitting and shimming to achieve a tight fit.
The advantage of vintage hand-cut pockets is flexibility. A skilled builder can hand-fit an oversized or undersized neck by selectively sanding pocket walls. CNC pockets are less forgiving because dimensions are fixed.
Diagnosing Neck Pocket Problems: Visual and Physical Assessment
Before fixing a neck pocket problem, identify exactly what's wrong. Many issues masquerade as setup problems, fret buzz, or intonation drift when the real culprit is a loose or misaligned pocket.
Identifying Gaps, Wiggle Room, and Heel Cracks
Remove the neck from the body and look directly into the pocket with a flashlight. Look for gaps between the heel and pocket walls, visible cracks in the pocket or heel, and signs of wood movement around pocket edges.
A gap at the heel indicates that pocket walls are not parallel or the pocket is too wide. The neck should seat fully against the back wall and sides without visible light showing through.
Reinstall the neck with all four bolts hand-tight. Gently rock the neck side-to-side while watching the heel-to-pocket gap. If the gap opens and closes, the pocket is loose. This rocking motion damages sustain and causes long-term structural problems.
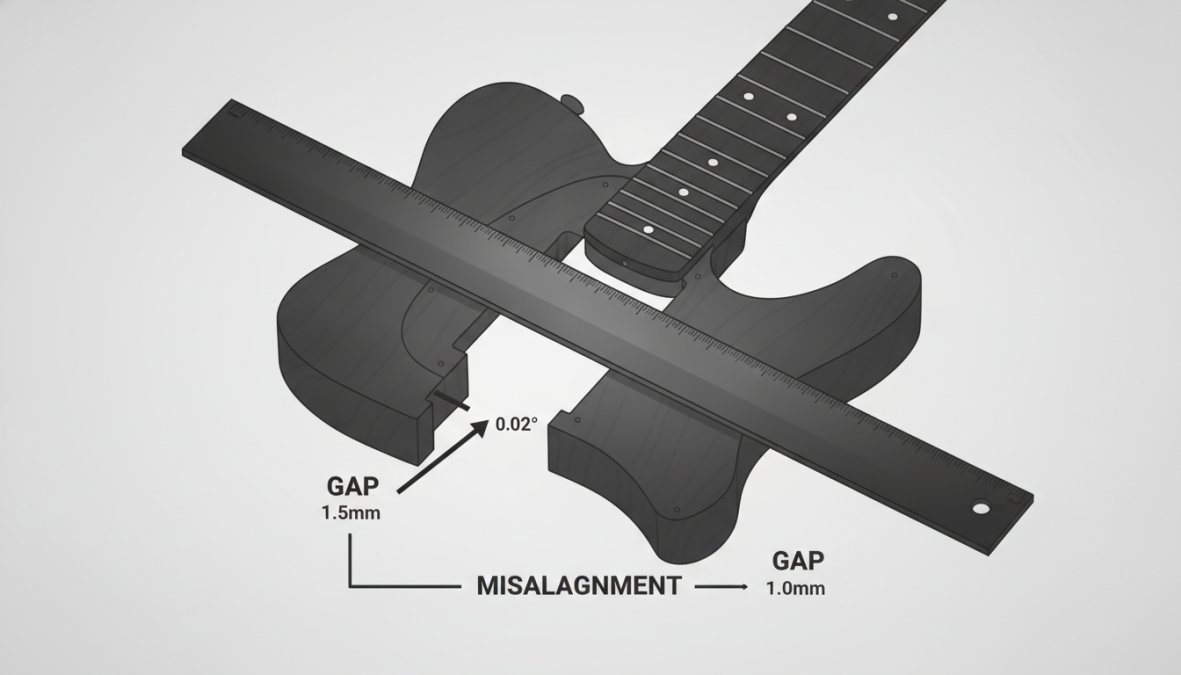
Check for heel cracks by running your finger along the heel surface. Cracks typically radiate from bolt holes or the back corner of the heel. Structural cracks indicate the pocket has been moving under load.
E-String Alignment and Neck Angle Issues
A loose pocket often manifests as neck angle problems. If the pocket is too deep or the back wall isn't square, the neck can tilt forward or backward, changing effective neck angle and directly affecting string action and bridge height.
Check neck angle by sighting down the fretboard from the headstock toward the body. The fretboard should appear level or very slightly angled downward toward the bridge. If it tilts upward toward the body, the neck is tilted back, a sign of either a pocket that's too shallow or a back wall that isn't square.
Use a straightedge to measure the pocket floor. Place it across the width of the pocket and look for gaps underneath. Any gap indicates the floor is not flat, causing the neck to rock when bolted down.
Routing Guitar Neck Pocket for Precision Fitment
If you're building a custom guitar body or repairing a damaged pocket, routing is your primary tool. Precision here determines everything that follows.
Woodworking Techniques and Sanding for Tight Fit
Start with a template made from hardwood or phenolic with clean, sharp edges. For hand routing, use a template guide on your router and a flush-trim bit that matches your template profile. Route in multiple shallow passes rather than one deep cut for better control and reduced tear-out.
The pocket floor is where precision matters most. It should be flat and level. After initial routing, flatten the floor using a router plane or sharp chisel. Aim for ±0.010 inches of flatness across the entire floor.
Sand the pocket walls smooth after routing using 120-grit sandpaper to remove router marks, then progress to 150 or 180-grit for a clean finish. Smooth walls reduce friction and allow the neck to seat fully.
Clamping and Alignment During Routing
The body must be held absolutely rigid during routing. Use a solid workbench and clamp the body down with at least four clamps. The body should not move even slightly when you apply hand pressure to the router.
Align the template carefully before routing, measuring from multiple reference points, body edges, bridge pin holes, or pickup cavity, to ensure accurate positioning. Mark your routing depth on the router base before starting.
How to Align a Bolt-On Neck in the Pocket
Once the pocket is routed and ready, careful alignment and bolting follow.
Step-by-Step Alignment Process
-
Inspect the neck heel. Examine for defects, finish issues, or irregularities. Sand any high spots smooth.
-
Dry-fit the neck. Insert the neck without bolts. It should slide in smoothly and seat fully against the back wall and sides.
-
Check the back wall contact. With the neck seated, look at the gap between heel and back wall. Ideally, there should be no gap.
-
Align the fretboard. Sight down the fretboard to ensure it's level and centered on the body.
-
Install bolts hand-tight. Insert all four bolts and tighten by hand until snug but not torqued.
-
Check alignment again. With bolts hand-tight, verify the fretboard is still centered and level.
-
Torque the bolts progressively. Using a torque wrench, tighten bolts in a cross pattern (top-left, bottom-right, top-right, bottom-left) to avoid pulling the neck crooked. Most Fender-style bolts are torqued to 35-45 inch-pounds.
Using Neck Plates and Checking Scale Length
The neck plate distributes clamping pressure across the pocket floor. A proper neck plate should be 4-5 inches long and about 1.5 inches wide, with four bolt holes aligned with pocket bolt holes.
The neck plate should sit flat against the body surface with no rocking or gaps. If the body surface around the pocket is uneven, you may need to shim under the neck plate or flatten the body surface.
After the neck is bolted in place, measure the scale length. Place a straightedge on the fretboard and measure from the nut to the 12th fret, then double that measurement. Standard scale length for a Stratocaster is 25.5 inches. If your measurement is off by more than 1/8 inch, the neck angle may be incorrect.
Fixing Loose Neck Pocket: Repair Techniques
If you've diagnosed a loose pocket, you have several repair options depending on severity and the specific problem.
Shims and Veneers for Gap Correction
Shimming is the most common repair for a loose pocket. A shim is a thin wedge of wood inserted between the neck heel and pocket wall to take up excess space and create a tight fit.
Shims are typically made from hardwood like maple, mahogany, or ebony, and are cut to fit the specific gap. A good shim is tapered so it fills the gap completely while remaining thin enough not to interfere with bolt holes or neck plate.
To install a shim, remove the neck and bolts. Measure the gap using calipers or feeler gauges. Cut a shim to match that gap, making it slightly longer than the heel so it extends into the pocket. Glue the shim to the pocket wall using strong wood glue like epoxy or hide glue.
A veneer is similar to a shim but is applied to the neck heel rather than the pocket wall. If the pocket is too wide or the heel is undersized, gluing a thin veneer (1/16 to 1/8 inch) to the heel increases its effective size.
Wood Movement, Humidity, and Long-Term Stability
One reason loose pockets develop over time is wood movement due to humidity changes. Wood expands when humidity is high and contracts when humidity is low. If a pocket is cut to be snug at one humidity level, it will become loose at another.
Build with wood movement in mind. A pocket that's slightly tighter than ideal at construction will often loosen slightly as the instrument acclimates to its environment. This is actually desirable.
Store your guitar in a stable humidity environment, ideally between 45 and 55 percent relative humidity. Extreme humidity swings cause more movement than consistently high or low humidity.
Guitar Neck Angle and Its Impact on Pocket Fit
Neck angle is the angle at which the neck sits relative to the body surface. This angle determines bridge height and string action. A loose pocket often causes neck angle problems because the neck can rock or shift in its seat.
Measuring and Correcting Neck Angle Issues
To measure neck angle, place a straightedge on the fretboard and another on the body surface or bridge top. Measure the vertical distance between these straightedges at the bridge location. This distance should be consistent with your target action, typically 3/16 to 1/4 inch at the 12th fret for electric guitars.
If the neck angle is off, the problem is usually one of three things: the pocket is too deep (causing the neck to sit too low), the pocket is too shallow (causing the neck to sit too high), or the back wall isn't square to the body surface (causing the neck to tilt).
Correcting neck angle requires either adjusting the pocket or shimming the neck. If the pocket is too deep, glue a veneer to the pocket floor to raise the neck heel. If the pocket is too shallow, you may need to route it deeper or remove material from the neck heel. If the back wall isn't square, use angled shims to correct the tilt.
Achieving Precision Neck Pocket Fit in Custom Builds
Building a guitar from scratch or assembling a DIY kit requires careful attention to pocket fit from the start. Precision here pays dividends in tone, playability, and long-term stability.
DIY Guitar Kit Assembly and Luthier Considerations
When assembling a DIY guitar kit, the neck pocket is often pre-routed but still requires inspection and fitting. Measure the pocket dimensions and compare them to the neck heel. If the fit is loose, shim or veneer before final assembly.
Many DIY kits come with necks that are slightly oversized to allow for hand-fitting. This is ideal, as it gives you control over the final fit. Take time to fit the neck carefully, sanding the heel or pocket walls as needed to achieve a snug, rattle-free fit.
If you're working with a luthier to build a custom instrument, discuss pocket fit expectations upfront. A professional luthier will understand the importance of precision and will build in the time and expertise to achieve it.
Custom Bodies and Necks from Haynes Guitar & Bass Build
For builders seeking precision components, Haynes Guitar & Bass Build offers custom-routed bodies with neck pockets held to tight tolerances. Our hand-built approach allows for meticulous attention to pocket flatness, wall squareness, and back wall alignment.
A well-routed pocket means your neck will fit snugly the first time, without shimming or adjustment. This translates directly into better tone, improved sustain, and a more professional-feeling instrument.
Custom Stratocaster bodies, Telecaster bodies, and Jazzmaster bodies are all available with precision-routed neck pockets, crafted to your specifications including wood choice, finish, and hardware routing.
Achieving precision guitar neck pocket fit isn't just about following specifications; it's about understanding how mechanical precision translates into acoustic performance. A loose neck pocket robs your tone and invites structural problems; a snug, well-aligned pocket creates an instrument that sounds alive and feels solid under your hands. Whether you're diagnosing an existing problem, routing a new pocket, or assembling a custom build, the principles are the same: measure carefully, fit precisely, and verify alignment at every step.
Frequently Asked Questions
How important is a tight neck pocket fit on a bolt-on guitar?
Neck pocket fit is critical for tone, sustain, and structural integrity. A tight, properly aligned pocket ensures maximum vibration transfer from the neck to the body, improving sustain and resonance. Loose pockets introduce flex and dampen vibrations, reducing tonal clarity. In bolt-on designs, the pocket is the primary connection point, poor fitment can cause E-string alignment issues and premature heel cracks. Precision fit is essential whether building a DIY guitar kit or commissioning a custom instrument.
What are the standard dimensions for Fender-style guitar neck pockets?
Standard Fender-style bolt-on neck pockets typically measure approximately 2.25 inches wide at the widest point (heel), with a depth of 0.75 to 0.875 inches. The pocket length is typically 3.375 to 3.5 inches. These dimensions are CNC-standardized on modern production instruments. However, vintage hand-cut pockets may vary slightly. When building custom bodies or DIY guitar kits, verifying these specifications against your specific neck is essential, even minor deviations affect alignment and tone.
Does neck pocket fit affect guitar tone and sustain?
Yes, significantly. A tight neck pocket fit maximizes vibration transfer between neck and body, directly improving sustain and tonal resonance. Loose pockets create gaps that absorb and dampen vibrations, resulting in duller tone and shorter decay. The heel-to-pocket connection is particularly important, heel cracks or gaps reduce structural integrity and cause acoustic energy loss. Whether you're building a custom instrument or repairing a loose pocket with shims or veneers, achieving precision fit is one of the most impactful tone improvements available.
What's the best way to fix a loose guitar neck pocket?
The most effective repair depends on the gap size. For minor wiggle room (under 0.5mm), shims, thin wooden or composite wedges, inserted between heel and pocket provide a quick fix. For larger gaps, veneers (thin wood strips) can be glued to the heel or pocket walls to increase fitment. Always account for wood movement due to humidity changes, use flexible adhesives and ensure proper clamping during repair. For DIY builds, precision routing during initial construction prevents these issues. If gaps persist after repair, consult a luthier to check neck angle and overall structural integrity.
This article was written using GrandRanker