

How to Solder Guitar Electronics: Step by Step
Table of Contents
- What You'll Need: Tools and Materials
- Safety and Ventilation: Protecting Yourself While Soldering
- Choosing the Best Soldering Iron for Guitar Electronics
- Preparing Your Soldering Iron Tip and Tinning
- How to Solder Guitar Pickups and Components
- Troubleshooting Guitar Electronics: Identifying and Fixing Cold Joints
- Removing Excess Solder and Cleaning Your Work
- Solder Alloy Recommendations: Vintage vs. Modern Components
Last Updated: August 8, 2026
According to practitioners who build custom guitars, soldering is often the difference between an instrument that sounds brilliant and one that sounds dead. Poor solder joints introduce resistance into signal paths, killing tone before it reaches the amplifier. This guide from Haynes Guitar & Bass Build covers how to solder guitar electronics step by step, with specific techniques for pickups, switches, and wiring that ensure every connection transmits signal cleanly.
Whether you're building your first partscaster or upgrading pickups on an existing instrument, understanding proper soldering technique transforms your work from risky to reliable.
What You'll Need: Tools and Materials
Soldering guitar electronics requires surprisingly few tools, but quality matters. A cheap soldering iron will frustrate you into abandoning the project halfway through.
Essential tools:
- A temperature-controlled soldering iron (25-40W for guitar work)
- Rosin core solder (60/40 tin/lead or lead-free equivalent)
- Solder flux (helps solder flow and bond properly)
- A wet sponge or brass wire cleaner for the tip
- Desoldering pump or solder wick (for removing mistakes)
- A multimeter (for testing continuity after soldering)
- Wire strippers and cutters
- Heat shrink tubing (protects insulation)
- A "helping hands" or third-hand tool (holds components while you solder)
The soldering iron is your most important investment. A station-style iron with temperature control costs £40-80 and will last years. Cheap irons overheat solder, making joints brittle and unreliable. Rosin core solder is standard for guitar work; the flux core helps solder flow smoothly. Avoid acid core solder, which corrodes guitar electronics. A small spool costs £8-15 and lasts through dozens of projects.
A desoldering pump (£5-10) removes bad joints cleanly, letting you try again without damaging components.
Safety and Ventilation: Protecting Yourself While Soldering
Soldering produces fumes that irritate lungs and sinuses with prolonged exposure. Work in a well-ventilated space or position a small fan to pull fumes away from your face. A basic fume extractor (£20-40) is worth the investment if you solder regularly.
Wear safety glasses, solder can splatter and the iron reaches around 350°C. Keep your work area clear of clutter. Let the iron cool before putting it away and never leave it unattended while powered on.
Choosing the Best Soldering Iron for Guitar Electronics
The best soldering iron for guitar electronics is a temperature-controlled station model. Station irons maintain consistent tip temperature, preventing the overheating that creates brittle joints.
Look for these specifications:
- Temperature range: 200-400°C
- Wattage: 25-40W
- Tip variety: interchangeable tips in different shapes (chisel, conical, fine point)
- Display: digital readout
A conical or fine-point tip works best for guitar electronics, concentrating heat precisely on small solder joints. Budget models start around £40; mid-range stations (£60-100) offer better stability.
The iron's tip condition directly affects your results. A corroded tip transfers heat poorly. A clean tip transfers heat efficiently, allowing solder to flow smoothly. This is why cleaning the tip regularly is non-negotiable.
Preparing Your Soldering Iron Tip and Tinning
A clean tip is fundamental to successful soldering. Before each joint, wipe the tip on a wet sponge or brass wire cleaner to remove old solder and oxidation.
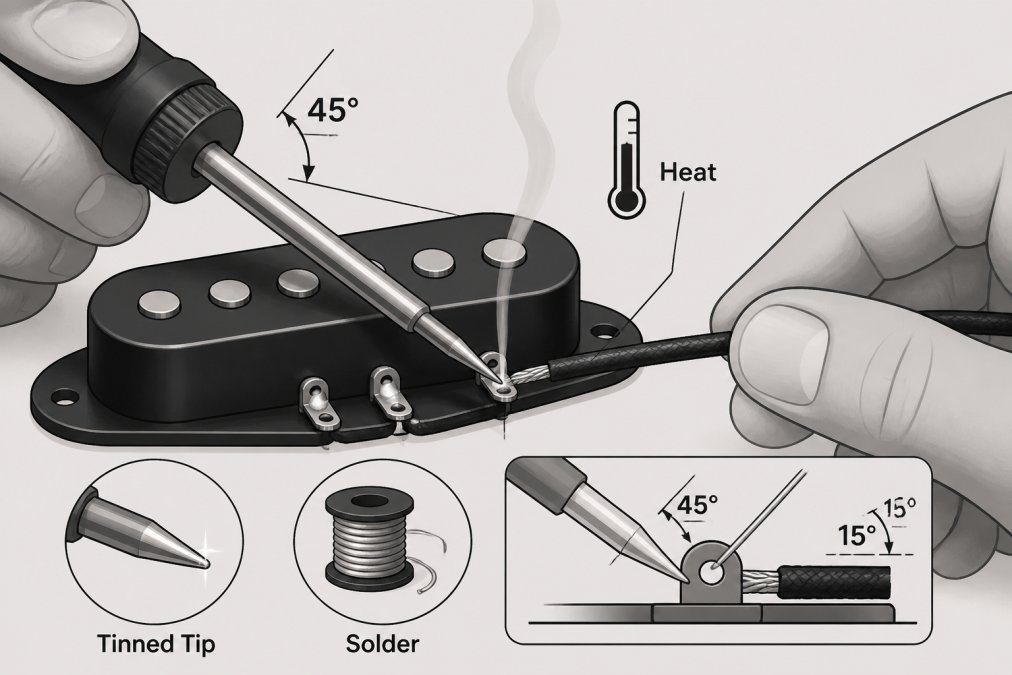
After cleaning, immediately tin the tip by applying fresh solder to it. Tinning means coating the tip with a thin layer of solder, which conducts heat far better than bare metal. A tinned tip looks shiny and wet; an untinned tip looks dull and dry.
If the tip becomes dull during work, it's oxidizing. Clean and tin it again. Keeping solder on the tip prevents air contact and slows oxidation.
How to Solder Guitar Pickups and Components
Soldering guitar pickups and wiring requires understanding how heat, solder, and component materials interact.
Tinning the Wire and Component Leads
Before soldering a wire to a component, tin both separately. Strip about 5mm of insulation from the wire end. Tin the exposed wire by touching the soldering iron to it and applying solder. The solder should flow smoothly onto the wire, coating it evenly.
A tinned wire looks shiny and silver. Next, tin the component lead you're soldering to. If you're soldering to a pickup lug, touch the iron to the lug and apply solder. Tinning both surfaces separately takes 10-15 seconds per connection but dramatically improves your success rate.
Heating the Joint Properly
Heat transfer is everything in soldering. The solder doesn't melt the joint together; the joint melts the solder. Position the soldering iron tip so it touches both the wire and the component lug simultaneously.
Hold the iron in place for 2-3 seconds. During this time, heat flows from the iron into both surfaces. You'll see the solder on both surfaces begin to flow and merge. This is the moment to remove the iron and let the joint cool.
If you heat for too long, you risk damaging insulation. If you heat for too short a time, you'll create a cold joint. The thermal mass of the component matters, a large pot lug requires more heat than a thin wire.
Applying Solder and Creating a Strong Connection
Once the joint is hot, touch solder to the junction between the iron tip and the component. The solder should flow smoothly into the joint, coating both surfaces. Use just enough solder to coat the joint smoothly.
Watch for the solder to flow and wet the surfaces. Good wetting means the solder bonds chemically to the metal. Once the solder flows and coats the joint, remove the iron. Don't move the joint for 5-10 seconds while it cools.
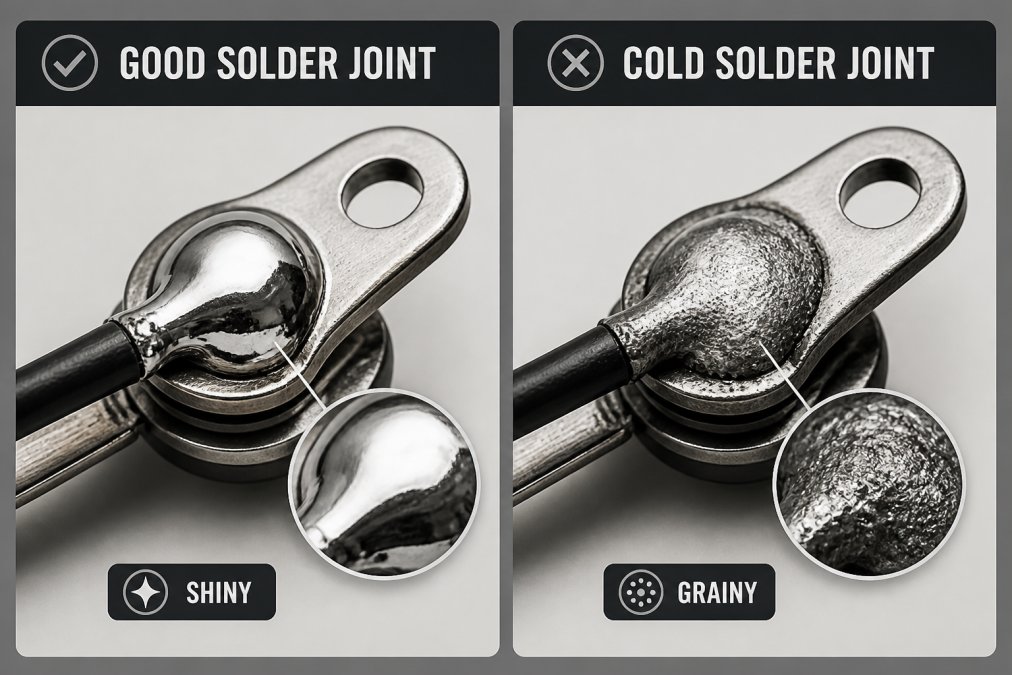
A properly soldered joint is shiny, smooth, and cone-shaped. If the joint looks dull and grainy, you've created a cold joint that won't conduct signal properly.
Troubleshooting Guitar Electronics: Identifying and Fixing Cold Joints
Cold joints are the most common soldering mistake and the primary reason custom builds fail electrically.
Spotting a Cold Solder Joint
A cold joint has a dull, grainy appearance instead of shiny and smooth. Cold joints happen when the component or wire isn't hot enough when you apply solder. The solder cools too quickly, creating a weak bond that conducts poorly and may fail under vibration.
The difference between a good joint and a cold joint is obvious once you see both. A good joint is shiny, smooth, and cone-shaped. A cold joint is dull, grainy, and blobby.
Testing Continuity with a Multimeter
After soldering, test each joint with a multimeter set to continuity mode. Set the multimeter to the continuity or resistance setting. Touch one probe to the wire and the other to the component the wire is soldered to. If continuity exists, the multimeter beeps or shows near-zero resistance. If the joint is cold, it shows high resistance or no continuity.
Testing continuity also catches solder bridges, where solder accidentally connects two components that shouldn't be connected.
Common Mistakes to Avoid
The most common mistakes are overheating the joint, underheating it, moving the joint while it cools, and using too much solder.
Overheating damages insulation and can lift component pads. If you're soldering for more than 5 seconds continuously, you're overheating. Increase the iron temperature instead of heating longer.
Underheating creates cold joints. If solder won't flow after 3 seconds, increase iron temperature or hold the iron slightly longer.
Moving the joint while cooling creates stress fractures. Wait 5-10 seconds after removing the iron before touching the joint.
Using too much solder creates blobs that hide cold spots. Another common mistake is soldering to corroded lugs. If a lug won't accept solder, clean it with fine sandpaper first.
Removing Excess Solder and Cleaning Your Work
After soldering, excess solder often remains around the joint. Use solder wick to remove it. Place the wick against the joint, touch the hot iron to the wick, and the wick absorbs the excess solder through capillary action.
A desoldering pump works by suction. After heating the joint, place the pump's nozzle over the solder and trigger the plunger. This is faster than solder wick but can leave small holes if you're too aggressive.
After removing excess solder, inspect the joint. It should be smooth and cone-shaped with no blobs or bridges. Clean the entire work area with a soft brush to remove flux residue.
Solder Alloy Recommendations: Vintage vs. Modern Components
Traditional 60/40 tin/lead solder is the standard for guitar electronics. It melts at around 190°C and flows smoothly, creating shiny, reliable joints.
Lead-free solder is mandated in some industries but isn't necessary for guitar electronics. It melts at higher temperatures (around 220°C), flows less smoothly, and creates duller-looking joints. For vintage-style builds, traditional solder is the better choice. For modern builds, either type works, but traditional solder is easier to work with.
Avoid rosin core solder with acid flux, which corrodes electronics. Use only rosin core solder designed for electronics.
Soldering guitar electronics properly transforms a risky task into a reliable skill. At Haynes Guitar & Bass Build, we know that tone starts with signal integrity, and signal integrity starts with clean solder joints. The hand-wound pickups we craft deliver their full sonic potential only when soldered correctly. Whether you choose our Haynes Golden Root 1957 Stratocaster pickup set or another quality component, proper soldering ensures you hear exactly what you paid for. Invest in a good soldering iron, practice the technique on scrap wire first, and test every joint with a multimeter before closing up your guitar.
Frequently Asked Questions
What wattage soldering iron is best for guitar electronics?
A 25-40 watt soldering iron is ideal for guitar electronics. Lower wattages (15-20W) heat too slowly and risk cold joints; higher wattages (60W+) can damage component insulation and potentiometer housings. A temperature-controlled station set to 350-380°C gives you precision without risk. Look for irons with fine tips (1-2mm) to reach tight spaces around pickups and lugs without affecting nearby components.
Do I need leaded or lead-free solder for guitar wiring?
Leaded solder (60/40 or 63/37 tin/lead ratio) is preferred for guitar electronics because it melts at lower temperatures (190-200°C) and flows more smoothly. Lead-free solder requires higher temperatures (220-250°C) and is more prone to cold joints if you're not experienced. Since guitar wiring doesn't face food contact or strict RoHS regulations, leaded rosin-core solder remains the safer, more forgiving choice for hand-soldering pickups and potentiometers.
How do I avoid burning guitar components while soldering?
Keep iron contact time under 3 seconds per joint. Use a damp natural sponge or brass wire cleaner to keep your tip clean, oxidation makes heat transfer inefficient and forces longer contact. Apply a small amount of fresh flux to the joint before soldering; this improves heat transfer and reduces heating time. Tin your iron tip first, then apply solder to the joint, not directly to the iron. Never hold the iron against insulation; heat the metal lug or wire instead, and solder flows to the joint naturally.
What are the most common mistakes when soldering guitar electronics?
The biggest mistakes are using too much solder (creating bridges between lugs), applying solder directly to the iron instead of the joint, and holding the iron too long on fragile components. Using a cold iron tip wastes time and creates cold joints. Not tinning the iron before each joint reduces heat transfer. Forgetting to use flux leads to oxidation and weak connections. Finally, not testing continuity after soldering means you won't catch failures until the guitar is wired up. Always verify your work with a multimeter before final assembly.
This article was written using GrandRanker